Create a Tour
| Features > Bookmarks and Tours > Create a Tour |
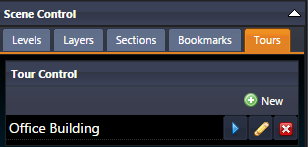
To create a tour, click the ![]() button in the "Tours" tab, as illustrated below.
button in the "Tours" tab, as illustrated below.
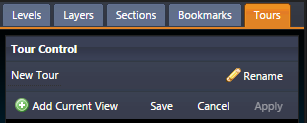
Upon clicking the ![]() button, the list of tours will be replaced with the tour editor, as shown in below illustration. In Tour Control, the newly created tour has a default name "New Tour", which you can rename by clicking the
button, the list of tours will be replaced with the tour editor, as shown in below illustration. In Tour Control, the newly created tour has a default name "New Tour", which you can rename by clicking the  button.
Subsequently, you can add a tour point by the steps as follows:
In the illustrated example of "Adding Tour Points" below, a tour point named "New View" has been added into the tour "MyTour".
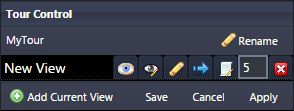
For each tour point, it has a set of buttons, which allow you to adjust individual settings. Specifically,
 Glide mode. This glide mode refers the way to glide from previous tour point to current one when the tour is playing, and you can choose between parabolic and straight glide modes.
 Advanced options. This button enables you to conduct advanced settings regarding the tour point, and you can find the details here.
You can design the tour by following the above explained steps: introducing tour points and then configure them. When the tour is playing, the tour points will be sequentially played, starting from the first one in the list.
You can change the order of a tour point by mouse-dragging its name.
When you have finished editing the tour points, click the "Save" to save and go back to the tour list. On the other hand, you can click the "Apply" to save the tour without leaving the editor, while clicking the "Cancel" will return the tour list and discard saving.